
A query about how to make backpack straps more comfortable arises. Everyone is trying to resolve that issue of how to make backpack straps more reliable.
When someone buys a backpack from a market, the straps often do not fit on his shoulders. When a company manufactures a backpack, they adjust the backpack straps in medium size according to the bag’s size, but they may not fit on your shoulders.
Further, numerous backpackers run extensive into pack, shoulders, and neck strain in the backpacking world. While carrying your essentials many miles, severe unpleasant pain may occur. You may feel like your backpack straps are dragging into your skin.
Super Straps : Make Any Backpack More Comfortable
After carrying all your essentials several miles, severe pain rears its ugly head. You may feel like your backpack straps are chopping into your flesh, or you may think that your shoulders and back are dragging a truck.
Have you ever thought of how to fix the problem of an uncomfortable backpack? If yes, here you will find the solution. After reading the following article, you would be able to tackle that pain.
Here you will find the basics of adjusting your shoulders straps, managing the weight, and modifying your backpack for pain-free hiking.

Make sure your backpack contains at least 9kg of essentials; otherwise, you won’t be able to manage the weight on the back when using the bag roughly.
Related: Best Backpacks for Engineering Students
Related: Best Backpacks For Graduate School
Quick Links
What is the backpack weight distribution?
So, you bought the right gear; you left the trivial items out of your selection. The only thing that’s left is actually to pack your bag. Not a big deal, right? Open the bag, put the gear in the bag, and close the bag, done. Well, it’s a little more than that. Backpack weight distribution is crucial for balancing, saving energy, stabilizing, and even preventing injury and complaints.
Make Sure the Weight is Layered Evenly
Often the disturbing pain or discomfort is not caused by the backpack, but the way they are packed. The backpack’s proper weight distribution can solve most of the problems related to pain caused by a load. It can save your high amount of vital energy keeping your backpack stable.
You are saving energy is very important, especially when climbing is involved.
The weightiest objects placed in the backpack should be oriented near the spine. If the load in a pack is not well-adjusted, i.e., one side of the bag has much more load than the others; then, the body muscles of that side need to work harder than others. This creates back and shoulders discomfort, as well as an adverse impact on your walking productivity.
To cope with this pain, hold the heaviest items centered in the bag as much as possible, preferably high against your spine. Place medium-sized objects around the side of the heaviest ones. Outer pockets should be used to hold lighter items, but remember that weight on each side of your pack should be well-balanced.
Packing your gears in a backpack in this optimized way leverages your body’s natural strength and increases workflow.
Checking the Bag is the Right Size
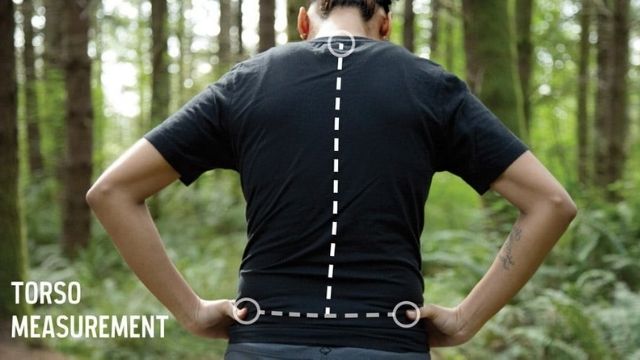
The most common problem while using a backpack is that it has a longer torso than the bag. This can cause lower back pain; therefore, your gear should be according to your torso length. Toro’s Length is the distance between the C7 vertebrae and the iliac crest.
C7 vertebrae are located at the point where your shoulder and back muscles meet, and it is straightforward to find at your neck. To discover your C7 vertebra, stand up straight and slide your hand down the back of your neck to spine; the first bump to feel is the C7 vertebrae.
This point is almost on a level with your shoulder blades. You can also consider a suitable marker that your backpack should not rise too much higher than this point.
Finding your iliac crest is straightforward, too, as it is the top of the hip bone.
Basically, you place your hands over your hips’ top, and where your index fingers meet behind you is where the bottom of your backpack should be resting.
Well, I hope you have come to know how to pack your hiking backpack and how large it should be to capitalize on your ease; let’s look at how to fit it correctly.
How to Size and Fit a Backpack?

Beyond everything, the ideal backpack for you is the one that fits your body well. Buy that one bag that is correctly sized and fits your torso length-not your height—for example, small, medium, large.
a) Measure Your Torso Length
To determine critical specifications which backpack fits you back well, you’ll need a person and a flexible measuring tape.
- First, tilt your head forward and find the bony bump place where the slope of your shoulders meets your neck. This the top of your torso length is called the seventh Cervical (C7) vertebra.
- Move your hands slightly down your rib cage and top of hip bones on each side of your body.
- Draw an imaginary line between your thumbs, with index fingers pointing forward and thumbs pointing backward. The base of torso measurements is actually a patch on lumber.
- Stand up straight and ask someone to measure the torso length precisely; stand up erect and ask someone to calculate the distance between the imaginary line and C7; the resultant calculation will be torso length.
b) Use Your Torso Length to Find Your Pack Size
Torso ranges vary from brand to brand and model to model according to sizes of backpacks. It would be better if you always tried bags physically because home measurements are often wrong.
c) Measure Your Hip Size

Backpack’s hip sizing could not be ignored even if backpack size is perfect for your torso length. So, measuring your hip is also essential. Your hips carry most of the backpack’s weight, so the well-fitted hip belt is vital.
For measuring hip size,
- wrap your tape measure around the top of your hips,
- You’ll find an iliac crest while measuring your torso length.
- This line is slightly higher than your beltline, so the hip belt size is a bit different from the pant-waist size.
d) Adjusting Torso Length

While buying a backpack for you, your priority should be to fit your torso length.
Recheck and reset torso length if your other adjustments do not fit accordingly. Adjustment straps can’t pay off for an incorrectly set adjustable suspension system.
e) Fit Adjustment at Home
A new backpack you buy from the market has many straps to adjust the load for your comfort. Your body’s strongest muscles are located in your legs, so the main objective is to set the bag to your hips by fixing straps.
You have four primary adjustment straps:
- Hip-belt
- Shoulder straps
- Load-lifter straps
- Sternum strap
Adjustments happen in two primary phases:
The Main Event: shoulder straps/hip-belt
The Finale: load-lifters/sternum strap
Wearing Your Backpack Correctly
As we told earlier on this page, loading a backpack on your shoulders is necessary before making these adjustments. Now here, we have provided four steps to wear a backpack.
Step #1 – Putting the Backpack on Your Shoulders
Warmly pull the shoulder straps by doing a small bounce and pulling the shoulder adjustment straps. For the moment, you would feel all the weight of your backpack on your shoulders. Don’t worry; this is only temporary.
This step energizes for the most vital part: adjusting the hip straps.
Step #2 – Stiffen the Hip Straps to Transfer the Weight
For comfortable backpacking, this step, adjusting the hip strap of your backpack, is most important.
Now you have all the bag’s weight on your shoulders, join the hip strap and tighten it as much as possible.
With all the pack’s weight on your shoulders, fasten the hip strap and stiffen it as much as possible. If you are not accustomed to doing this, take it as a belt for your trousers; you would benefit from getting it a tight and comfortable fit around your waist.
This step is completed correctly; your hips utterly carry the weight of your bag, so you can now relax your shoulder straps. The shoulder straps stop your backpack from falling off your back! After this step, you can easily place your fingers between your shoulder and shoulder strap.
Your shoulders would feel gentle weight now. Hip; the most vital part of the body; the pressure points are centered on your hip, which abolishes most of the back and shoulder pain and discomfort caused by just wrong fitting.
Step #3 – Correct Your Shoulder and Side Load Straps
Shoulder straps would not carry any weight, but still, they need to be squeezed to remove any roominess between the bag and your upper back.
Find the side load straps around the bag and by your buttock’s region. Tighten these straps to the extent that there is no room between the bag and your lower back.
Step #4 – Sternum Straps
Once the shoulder straps are fully adjusted, it is now time to make sure the sternum strap is fitted well; this one fastens across your chest. Join it together and tighten it to make the bag as balanced as possible and secure it from wobbling around as you walk.
Finally, all the straps are correctly accustomed and fastened. If you are feeling discomfort due to tight hip straps, you may loosen your hip straps.
Don’t Slender Too Far Forward When Mountaineering a Flat Trail
Leaning forward is our normal inclination while carrying a heavily weighted backpack as if we are trying to carry weight directly on our backs. Avoid this!
For posture, a gentle lean forward is good, but it should exceed the limit that muscles, which are not suitable to take the strain, take the stress of your pack.
Lean forward only in case you are climbing a hill. This proves to help take the most advantage of your gravity and keep your back and neck away from pain.
Take regular breaks
Every hour or more than an hour would be okay. While walking, at any time, if you feel the shoulders straps of the backpack are too loose or too tight, stop walking at the moment. Take rest for a few minutes – Re-adjust your bag; your body will relax in return for the long run.
Must take breaks after a couple of hours and take the bag totally off from the back, no matter how fit, healthy, and experienced you are. This allows your muscles to be relaxed and recover, which is excellent for your journey.
Warm-up and Cool Down
For any repetitive exercises, warming up and cooling down is essential as it reduces distress for the next day. There are numerous sources to guide you.
After you finished your journey or reached the classroom, or returned to the home, the simplest thing you can do is stand your hands towards the sky and slowly rotate them in a circular motion with your pack off. This will reduce your muscle tension and restore your blood flow.
Summary
The love of hiking would not cause your uneasiness, especially if you follow the steps we have listed above.
Make sure your pack is balanced well according to weight, with heavy gears in the middle. As told earlier, your hip bones are the most vital part of the body, so check your shoulder, sternum, and hip straps are appropriately adjusted so that most of the weight is focused on your hips.
Take rest and regular breaks on the trail and once in each interval, put off the bag from your back and then re-adjust as soon as you feel discomfort or pain. Please don’t ignore any discomfort or pain; it may go worse in the long run.
Just follow these simple steps, and you’ll be amazed at how much more comfortable your backpack straps will feel.